
In many cases, it makes sense to create custom post types to organize data for display on your WordPress site.
While WordPress has several default post types (Posts, Pages, Media, etc.), custom post types offer more flexibility for websites with specialized content needs. They allow for unique fields, taxonomies, and templates tailored to specific content categories.
Benefits of Custom Post Types
There are several benefits to using custom post types in WordPress rather than relying on posts or multiple pages. These include:
- Ease of data management. Editing content in one place in wp-admin while that same content can be displayed in multiple ways on the site’s front end. Creating templates to control the display of content rather than individual pages makes editing and managing a large number of entries easier for large data sets.
- Limiting design access. For sites with multiple users with varying WordPress design abilities, setting up custom post types allows for easier data entry without affecting the design or display. Users can easily enter, edit, and delete data without affecting navigation or design.
Examples of Custom Post Types
Some examples of sites that can benefit from custom post types include:
- Real estate listings and agent directories
- Adoption databases for pet rescues
- Job listings
- Digital agency portfolio
- Product listings
- Event listings
With the power of GeneratePress, displaying this data on the front end of your site is both performant and easy.
Here’s how to get started.
Set up your Custom Post Type
There are numerous ways to set up custom post types in WordPress, but the easiest way is to use a plugin. Advanced Custom Fields is a free plugin that allows you to set up a custom post type and manage the fields within it.
Navigate to ACF > Post Types and click “Add New” to create your new custom post type.

Next, add your custom post type.
- Plural Label. Enter the plural name (e.g., “Portfolios”).
- Singular Label. Enter the singular name (e.g., “Portfolio”)
- Post Type Key. Enter a unique slug (e.g., “portfolio”).
- Ensure that your new post type is set to “Public.”

Under “Advanced Configuration,” we can select which standard WordPress fields we would like to include. For our example, we are removing the block editor. Our front-end display will be completely controlled by GeneratePress Elements, but we will also use Title and the Featured Image from WordPress core fields. This will make it easier for data entry on wp-admin.

Under URLs, make sure that Archive is set on and enter the name of your archive, in this case using “portfolio.”

Click “Save Changes” to complete the setup. Your new custom post type will now appear in the WordPress dashboard’s left sidebar.
Add Custom Post Type Fields
Once your custom post type is registered, set up additional fields for it. Click the “Add Fields” button at the top of the page.

For example, in a portfolio case, you might want to be able to list:
- Client name
- Industry
- Project Date
- Project URL/Link
- Tools/Technologies Used
- Gallery
- Testimonial/Quote
- Status (e.g., Completed, In Progress)

Entering Custom Post Type Data
Once you’ve created your custom post type and added fields, add your data.
In our portfolio case, you’ll see the new post type on the sidebar of your WordPress admin. Click “Add New Portfolio” and your editing screen for the portfolio post type will have your additional fields in the editor.
Note that because we chose not to use the editor, the standard block editor isn’t shown when adding or editing portfolio items.

Displaying Custom Post Types using GeneratePress
To display our custom post type, we need to create a template. A simple way to do this is by using the GeneratePress Premium Elements module to build a single post Content Template and the archives Loop Template.
Ensure that Elements are activated in GeneratePress settings. Head to Appearance > GeneratePress, and activate Elements.
Creating the Single Post Template
To set a template that provides an overview of an entire portfolio entry, we’ll set up a single post template.
Navigate to Appearance > Elements.
Click New Element, then choose Block Element as the Element Type. Click Create.

Title the template something descriptive such as “Portfolio Single Post Template.”
On the right sidebar, change the element type to “Content Template.”

Go to the bottom, choose Location to “Portfolio,” and make sure it is set to “All Portfolios.”

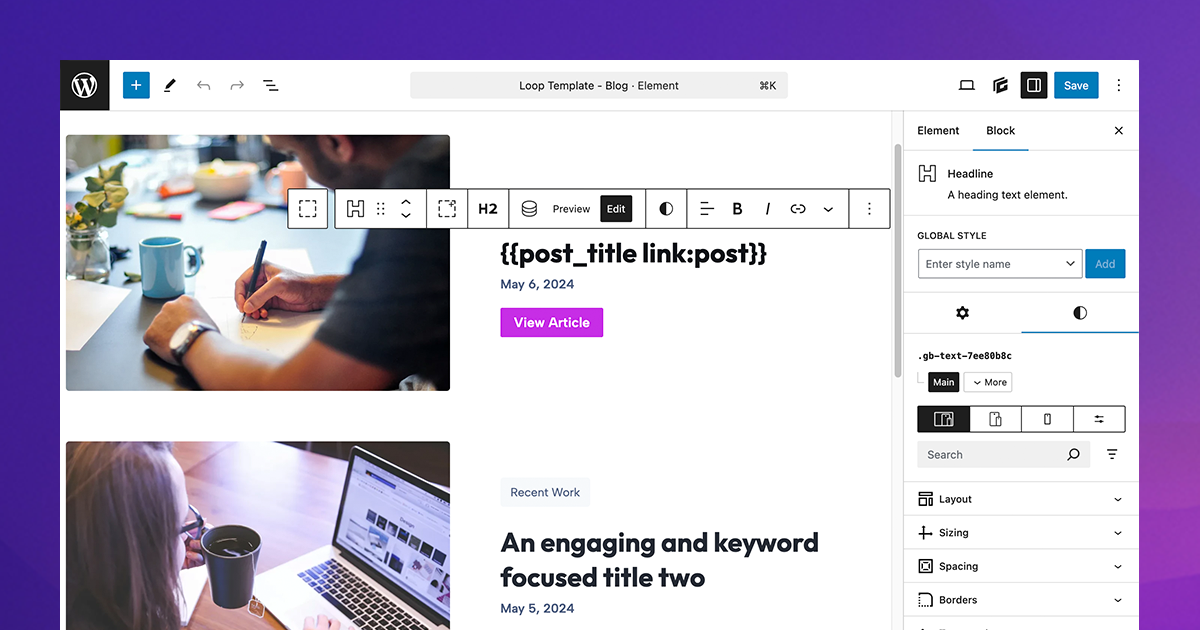
Using GenerateBlocks, design your page. On every block, you’ll see an option to set the dynamic content. For our Portfolio, we will set the Client Name using the Headline Block.
Click the Dynamic Tags button on the block.

Under “Select Dynamic Tag,” choose Post Meta. For the Meta Key, enter the key from Advanced Custom Fields. In this case, it is “client_name.” The resulting entry will be: {{post_meta key:client_name}}

Do this for every field, designing the content template however you wish.
If you want one of the elements to have a dynamic link, you can do this as well with the “link to” entry. For our portfolio, we create a button element to display “Visit {{post_meta key:client_name}}” and the link set in the right panel to the Project URL. You can set the link to open in a new tab, nofollow, or set the link as sponsored, too.

Save the page.
In a separate window, open wp-admin and navigate to your entered portfolios on wp-admin. Click on each to view how the content template displays each of your portfolio post types and modify the content template as needed.
Creating a Loop Template
You’ll likely want to create an overall portfolio overview page in which all of the portfolio entries are listed.
First, set up a blank page called “Portfolio.” We’ll replace this page with the portfolio loop below.
Navigate to Appearance > Elements.
As before, click New Element and create a Block Element as before.
Title the template something descriptive such as “Portfolio Loop Template.”
On the right sidebar, change the element type to “Loop Template.”

Go to the bottom, choose Location to replace a single Page, and then choose the blank “Portfolio” page you’ve set up. This tells WordPress to replace the blank portfolio page with our Portfolio Loop Template.

Next, let’s design the loop. As with the design for the single post template, you can place the following into a Container block for greater control.
Select the GenerateBlocks Query Block.

In the next screen, select “Start Blank.”

At this point, it’s helpful to open the “List View” left sidebar. There, you will see that bringing in the Query Block also brings in two sub-blocks: Looper Block and Loop Item.

On the Query Block, ensure that you select Query Type as Post Query, and for Post Type, select Portfolios.

On the Looper Block, you’ll find numerous options for layout.
For our example, we’re choosing a two-column layout. You’ll see that GenerateBlocks automatically sets the layout to Grid, and you can control how much spacing you would like between your looped items here, as well as any borders you would like around each item.

On the Loop Item Block, start by adding the dynamic elements you want to display. We’ve set up our loop item to display the client name, the featured image, and a button to view the portfolio.

We’ve also added links on the displayed featured image and the button to visit the post’s permalink.

Navigate to the /portfolio/ page on the front end of the site, and modify the layout to suit your needs.
3rd picture is not from Generate Press, please make correction.
For our example, we used Advanced Custom Fields to set up the custom post type. That screenshot is from ACF.