
As online marketers and web developers, we’ve all been there. It’s a holiday weekend, you’re full of turkey, but it’s also the midst of an important sale for your business, and the sale ends at midnight. No one wants to be burning the midnight oil to take down the sales banners on our WordPress site over a holiday weekend.
Fortunately, with GenerateBlocks Pro, you can automate the display of sale banners using Conditions. Set the display date and time-based rules to show or hide any content automatically. No more late-night edits; just set it and forget it. GenerateBlocks manages the end of your sale automatically.
In this tutorial, we’ll walk through creating a date-time condition for a sale that ends at midnight. We’ll cover both a site-wide sale banner using a simple block setup and a popup via Overlay Panels. By the end, you’ll have the tools to let your site handle the heavy lifting while you rest easy.
Prerequisites
- A WordPress site.
- GenerateBlocks free plugin installed.
- GenerateBlocks Pro, version 2.4 or later for block-level conditions.
- GeneratePress theme for Elements for site-wide content.
- Basic familiarity with the WordPress block editor.
If you’re new to GenerateBlocks, it’s a lightweight block plugin that lets you build custom layouts with containers, headlines, buttons, and more. The Pro version adds advanced features like Conditions, which control visibility based on rules like date and time.
Step 1: Create Your Sale Banner Block
Let’s start with a simple sale banner; think of a colorful strip at the top of your site saying “50% Off – Sale Ends Tonight!”
If you’re using the Site Header and Navigation Block in an Element, add a Container block above the Site Header block. Use the List View option on the left to “Add Before” to ensure it is above the Site Header block.
- Inside the Container, add a Headline block for your sale text (e.g., “Flash Sale: 20% Off Everything! Ends at Midnight!”).
- Add a Button block for a call-to-action like “Shop Now.”
- Style it up. Set the container background, add padding, and adjust margins to ensure it looks the way you’d like.
If you’re not using the Site Header Block, you can still use Elements to create a banner to appear above your site header.
- Create a new Element. Choose Block as the type.
- Label the Element something intuitive, such as “Sale Banner.”
- On the Element settings, set the Element Type to “Hook.”
- Choose “
wp_body_open” from the Hook Name drop down. - Under Display Rules, set the Location to “Entire Site.”
- Add a Container to the design, and add the Headline for sales text, a button, or any other design elements you’d like in the banner.
- Publish the Element.

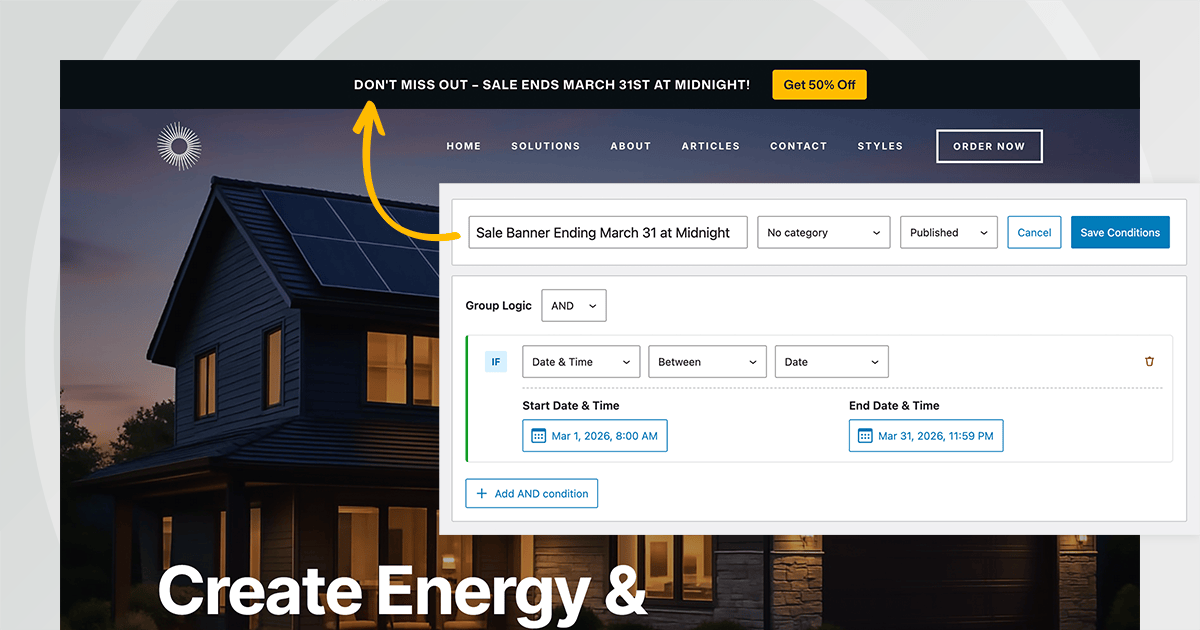
Step 2: Create the Date-Time Condition
Now, the magic part: Setting up the Condition on the Container block so the banner disappears automatically at midnight at the end of your sale. There are two ways to get to Conditions, either go to GenerateBlocks > Conditions and set up the Condition there, or click the plus (+) sign next to Display Conditions under Advanced on the Banner Container Block.
- Give your Condition a descriptive name, like “Sale Active Until Midnight March 31, 2026.”
- Add a rule under the AND Group Logic: Select Date & Time.
- Set the operator to Between and set the start and end dates of the sale. If the sale has already started, choose “Before” and enter the ending date and time for the sale.
- Save the Condition.

Step 3: Apply the Condition to Your Banner
- Back in the Element containing your sale banner, select the Container block containing the banner, i.e., the banner wrapper.
- In the block settings sidebar, expand Advanced.
- Under Display Conditions, select your new condition from the dropdown.
- Update the Element.

That’s it! The banner will now only show during the specified date range. For time zones, note that conditions use your site’s server time (check Settings > General in WordPress).
Step 4: Set Up a Sale Popup with Overlay Panels
Popups are perfect for urgent sales reminders. GenerateBlocks Pro’s Overlay Panels make this easy.
- Go to GenerateBlocks > Overlay Panels > Add New.
- Choose Standard type.
- Build your popup content: Add a Container, Headline (e.g., “Don’t Miss Out – Sale Ends at Midnight!”), an image for visuals, and a button to shop. To speed your build, leverage the GenerateBlocks Pattern Library’s pre-built popup designs that you can customize.
- In the sidebar, under Overlay Panel Options, set triggers (e.g., on page load, time delay, or exit intent).
- In the same sidebar, select your date-time condition under Display Condition.
This ensures the popup only appears during the sale period. Overlay Panels support animations and positioning for a professional look.
Step 5: Test and Go Live
- Preview your site at different times/dates (use a plugin like “WP Time Capsule” or manually adjust your system clock for testing).
- Check on mobile/desktop, and add Device Type rules if needed.
- Monitor: Use the “Check Usage” option in Conditions (under the three dots on the right side of the Condition listing) to see where it’s applied.
- Organize sale banners into categories to keep your Conditions organized for future maintenance.
With this setup, your sale content vanishes precisely at midnight, no manual intervention required. Sweet dreams, developers and marketers! No more sleep interruptions just to take down banners and popup promotions.
Interesting read, thanks for sharing this.
We hope it’s helpful! Thanks for reading.
This series of tutorials on conditions is really interesting and useful. Thanks, Kathy!
I’m so glad they’re helpful! Thank you for the comment, Leonardo!
Me encantan los tutoriales escritos. Mi ingles no es muy bueno y tener la posibilidad de seguir paso a paso el tutorial es genial para mi. Además puedo traducir la página a español por lo que es mucho más sencillo que los vídeos (aunque estos también me gustan).
Gracias por crear estos artículos de ayuda.
Gracias por el comentario. Nos alegra que el tutorial escrito le resulte útil. Gracias por utilizar GeneratePress.