
Are you using the lightweight subscriber-only content system we showed you in our original tutorial?
That setup is powerful, offering teaser content for everyone, premium content for logged-in subscribers, and a clean call-to-action (CTA) for non-subscribers. But sending visitors to a separate subscription page when they click “Get Access” adds friction.
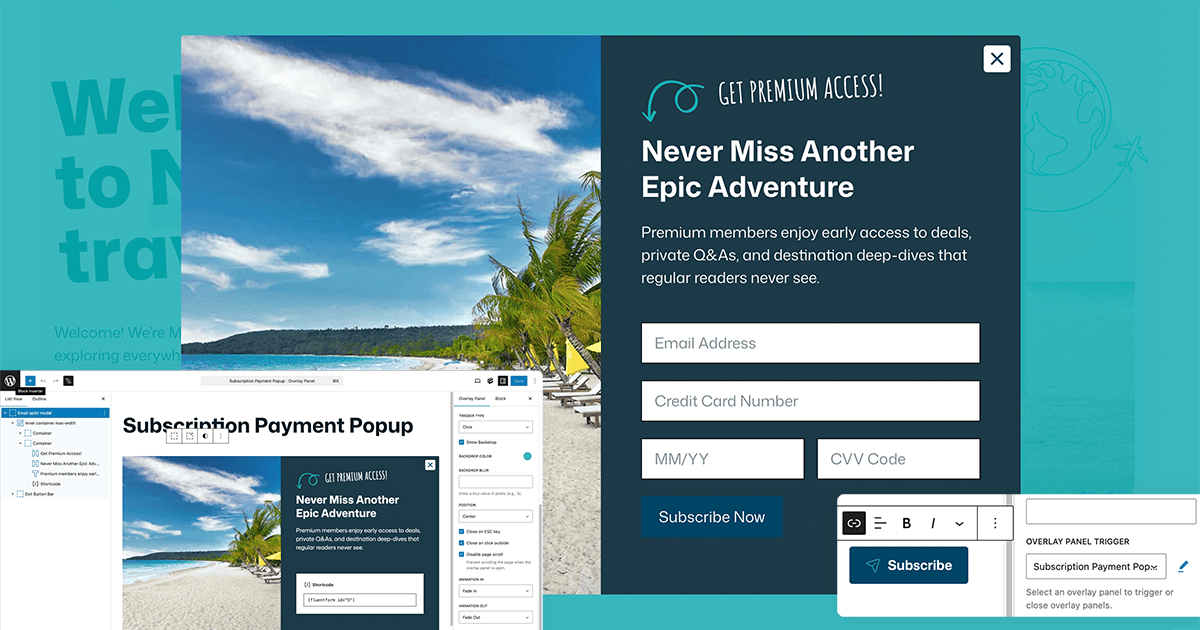
With GenerateBlocks Pro, you can replace that redirect with a beautiful, in-page payment overlay (i.e., a modal popup) that appears instantly when someone clicks the CTA button. The visitor never leaves the post. Your form stays front-and-center, and conversions improve dramatically. One case study reported a 40% increase in conversions with a pop-up-based checkout.
Best of all, this works with any form or cart plugin you already use: Gravity Forms, WS Forms, Fluent Forms, Paid Memberships Pro, WooCommerce, Stripe embeds, PayPal buttons, or even a simple shortcode. With GenerateBlocks Pro, no extra pop-up plugins are required.
While we’re showing this example as an addendum to our previous post, this strategy applies to any short-payment collection process.
Here’s exactly how to do it.
What You’ll Need
- GeneratePress
- GenerateBlocks Free
- GenerateBlocks Pro
- The subscriber-only post setup from our previous tutorial already in place
- A payment/subscription form from your chosen payment collection tool
Step 1: Create a New Overlay Panel
- Go to GenerateBlocks > Overlay Panels in your WordPress dashboard.
- Click Add New.
- Give it an intuitive title like “Subscription Payment Popup”.
Step 2: Configure the Overlay Panel Settings
In the right sidebar under the Overlay Panel tab, choose the settings that will ensure your popup shows properly. These include:
- Overlay Panel Type: Choose Standard (perfect for centered modals/popups).
- Trigger Type: Set to Click (we’ll connect this to the CTA button in a moment).
- Show Backdrop: Enable this (recommended). Set a semi-transparent black or your brand color and optional blur for a polished look.
- Close on ESC key: Enabled (default).
- Close on click outside: Enabled (default).
- Disable Page Scroll: Enable this, as it prevents scrolling the post behind the modal.
- Animation: Choose “Fade In” + “Fade Out” (or Slide In from Bottom) and set a smooth 300–400ms duration. Play with these settings for the desired effect.
- Width Mode: “Content Width” or “Full Width.” Most payment forms work great at 600–800px max-width.
- Position: Center (default).
You can leave Display Conditions at “No Condition” unless you want the overlay to appear only on specific posts. Should you want different messages or tiers to appear on different posts, you could easily set up various Overlay Panels and use GenerateBlocks Conditions to segment and test different messages.
Step 3: Build Your Payment Form Inside the Overlay
Now design the actual popup using regular GenerateBlocks within the Overlay Panel. We recommend starting with the GenerateBlocks Pro Pattern Library to get up and running quickly. The pro patterns for popups include everything you need already set, including the close popup logic.
- Add a Container block as the root. Add or modify the padding, background color, border-radius, and a subtle shadow for that premium modal feel.
- Inside the Container, add the headline, a short sub-headline with a benefits statement.
- Add your payment collection method. This could be a shortcode from your form plugin, a shortcode for WooCommerce checkout, or a product add to cart shortcode.
- Style everything to match your site. GenerateBlocks makes it effortless with the same controls you already know.
Pro Tip: Most modern form plugins support AJAX submission. Test that the form submits without closing or reloading the entire page.
Step 4: Connect the CTA Button to the Overlay
Now link everything together.
- Open any post that uses the subscriber-only layout, or the GeneratePress Element if you have chosen to create a template for subscriber-only content.
- Locate the non-subscriber CTA Container, the one with the “User Role is Logged Out” condition. If you’re not sure where it is, head to GenerateBlocks > Conditions, click the 3 dots to the right of the Condition to check usage.

- Select the Button block inside the CTA, the one that previously linked to your subscription page.
- In the block settings sidebar, go to the Advanced tab.
- Scroll down to Overlay Panel Trigger. Choose the newly created panel from the dropdown.

- If you had previously had the CTA button linked to another page, remove the old URL from the link or set it to #.
- If desired, update the button text to something compelling like “Unlock This Post” or “Get Instant Access.”
- Save/Update the post or Element.
Step 5: Test Everything
- View the post while logged out. Use a different browser or an incognito window.
- You should see the teaser copy and the non-subscriber container with the CTA button.
- Click the button to see that the payment overlay appears instantly.
- Test the form submission.
- Log in as a subscriber, the CTA disappears and premium content appears.
Ensure you run the test across various screen sizes to confirm it works as intended.
Advanced Tips & Enhancements
- Multiple payment options. Add tabs inside the overlay (using GenerateBlocks Tabs) for monthly vs. yearly plans. Provide a discount for those who pay for annual access.
- Logged-in non-subscribers. Want a different message for users who are logged in but not yet paying? Create a second CTA Container with a different condition and trigger a different overlay.
- Mobile-friendly. GenerateBlocks Overlay Panels are fully responsive by default.
- Reuse across the site. One overlay can be triggered from any button on your entire site. A subscribe button in your header or footer can easily be linked to the Overlay Panel using the same trigger.
You’re Done! A Frictionless Subscriber Experience
That’s it! You now have a professional, lightweight paywall that keeps visitors on the page and makes subscribing effortless.
No heavy membership plugins.No extra popup tools.Just high performance GenerateBlocks magic.
Ready to take your membership or subscription site to the next level? Grab GeneratePress One which gives you everything you need for lightweight and easily customizable Overlay Panels.