
Running ads on social media is a fantastic way to drive traffic to your WordPress site, but what if you could personalize the experience for those visitors? With GenerateBlocks Pro, you can use Display Conditions to show special on-page offers and even trigger popups based on UTM parameters in the URL. This means users coming from your ads see tailored content, boosting conversions without overwhelming regular visitors.
In this tutorial, we’ll guide you through setting up a conditional inline offer block and a conditional popup using Overlay Panels. It’s perfect for eCommerce sites, blogs, or any content-driven platform looking to maximize ad ROI.
What You’ll Need Before Starting
- WordPress site, using the block editor.
- GenerateBlocks Free. Find this under Plugins > Add New, then search for GenerateBlocks. Install and activate.
- GenerateBlocks Pro. Version 2.3 or later for Overlay Panels and advanced Conditions. This is essential for query string conditions and popups.
- Social media ad platform. Facebook Ads, Twitter Ads, or LinkedIn, where you can add UTM parameters to links.
- Basic ad setup knowledge. We’ll cover UTM basics, but you should know how to create campaigns.
No extra plugins needed; GenerateBlocks handles it all natively.
What are UTM Parameters?
Before starting, it can be helpful to understand what UTM parameters are, and how they’re used.
UTM parameters are small snippets of text added to the end of a URL. For example, if you’re linking to https://[yoursite].com/promotions_page, you would add UTM parameters after the URL to look like https://[yoursite].com/promotions_page?utm_source=facebook&utm_medium=social&utm_campaign=summer_sale.
These appended values help track the source, medium, and specific campaign responsible for driving traffic to a website.
Originally created by Google, UTM stands for Urchin Tracking Module and are now a standard used across analytics platforms like Google Analytics, Matomo, and others. As such, they’re widely used and often available from advertising sources.
Marketers append these tags to links in emails, social media posts, paid ads, newsletters, or any outbound content so they can accurately measure which channels, campaigns, or creatives are performing best. This data reveals not just how many visitors arrived, but where they came from and why.
This tracking enables better budget allocation, A/B testing of ad copy, and optimization of marketing efforts. Without UTM parameters, traffic from different sources often gets lumped together as “direct” or “referral,” making it much harder to understand true performance.
GenerateBlocks Conditions, Parameters, and Other Data
Because the UTM parameters are simply appended to the linked URL, no additional data is required to display different content based on source or campaign. As such, you can establish Conditions to display content based on these parameters.
GenerateBlocks Conditions are not limited to UTM values. Conditions can also be set based on referrer, or the source URL of the link from which the site visitor is coming, as well as a number of other values.
If you have an affiliate program, for example, and a clicked link comes to your site with an affiliate ID parameter, you can also detect that and show specific content based on the affiliate parameter on the link.
In this tutorial, however, we’ll look specifically at social media ads with UTM parameters.
Step 1: Set Up Your Social Media Ads with UTM Parameters
UTM parameters are tags added to your ad URLs to track traffic sources. For this tutorial, we’ll use them to trigger conditions.
- In your ad platform (e.g., Facebook Ads Manager), create or edit a campaign.
- When setting the destination URL, append UTM tags like: ?utm_source=social_ad&utm_medium=facebook&utm_campaign=special_offer.
- Focus on a specific parameter for the condition, such as utm_campaign=special_offer. This will be our trigger.
- Launch the ad and test the link. It should land on your page with the UTM in the URL (e.g., your-site.com/page?utm_campaign=special_offer).
This step ensures visitors from ads carry the identifiable tag so that our Condition can detect it.
Step 2: Create an Inline Offer
The inline, or on-page, offer is a section of content such as a discount banner embedded directly in your page or post.
- Go to Posts/Pages > Add New or edit an existing one where you want the offer.
- Insert a GenerateBlocks Container block. This will hold your offer content.
- Inside the Container, add a Headline (“Exclusive 20% Off for Ad Visitors!”), a Paragraph with details, and a Button linking to a checkout or form. Use the Pattern Library in GenerateBlocks to get started with your call to action.
- Style it to stand out. Use colors, borders, or imagery via GenerateBlocks’ options.

Step 3: Apply Display Conditions to the Inline Offer
GenerateBlocks Pro lets you control block visibility based on query parameters
- Select the Container block.
- In the right sidebar, go to Advanced > Display Conditions.
- Click Add New to create a new Condition or select an existing Condition.
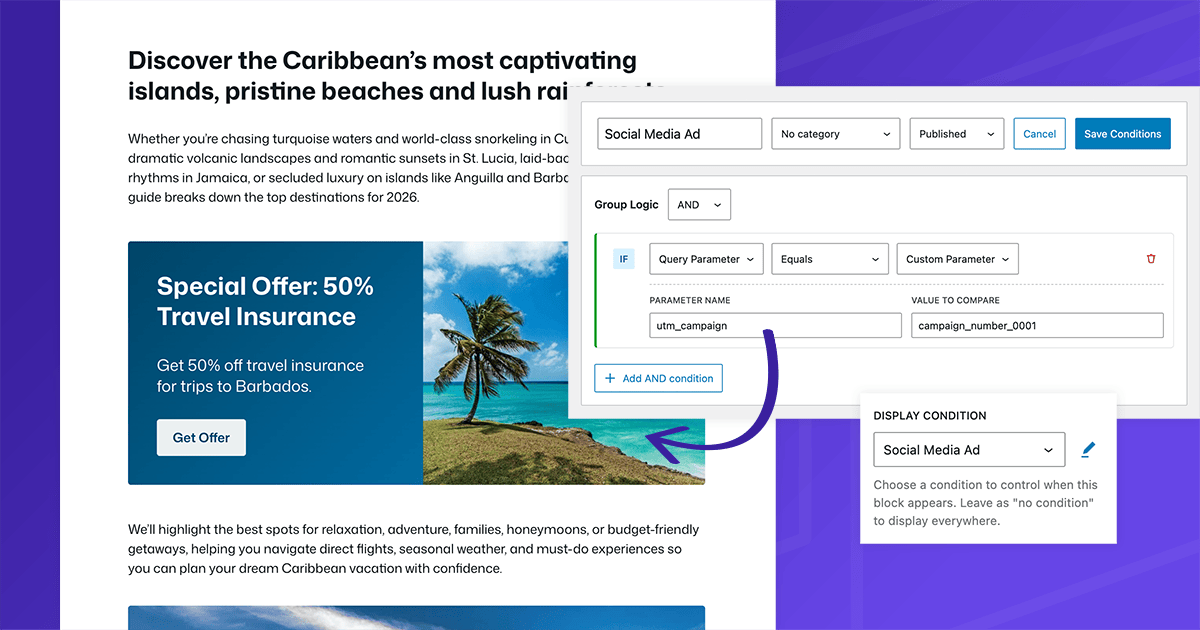
- Set the rule:
- IF Query Parameter > Custom Parameter.
- Operator: Equals (or Contains for flexibility).
- Set the Parameter Name to the value you’re detecting (e.g., “utm_campaign”).
- Value: “campaign_number_0001” (matching your UTM).
- Save and name the condition (e.g., “Social Ad Visitors”).
- Apply it to the Container block containing your inline banner.
Now, the offer only appears for users with that UTM in their URL. Test by clicking on the ad to ensure it loads correctly.

Step 4: Create a Conditional Popup
For the popup, use GenerateBlocks’ Overlay Panels feature, which allows building modals and popups with blocks.
- In the WordPress dashboard, navigate to GenerateBlocks > Overlay Panels.
- Click Add New.
- Choose Standard as the Overlay Panel Type for a basic popup.
- Build your popup content using GenerateBlocks: Add a Container for the wrapper, Headline for the title (“Welcome, Ad Visitor!”), content blocks, and a close button.
- Configure popup settings like position (center), backdrop color, and triggers. For a popup like this, you might consider a timed delay or exit intent for added engagement.
Step 5: Apply Conditions to the Popup
Conditions work seamlessly with Overlay Panels to make them conditional.
- In the Overlay Panel editor, go to Display Condition in the settings.
- Select an existing Condition or create a new Condition. For our example, we will reuse the Condition from Step 3 if you only want to show this popup to people visiting from the social media campaign that is also seeing the banner you set up in step 2.
- Save and publish the panel.
The popup will now only activate for this specific ad traffic, creating a targeted experience.
Step 6: Test and Launch
- Visit the page without the Condition’s UTM parameter in the URL. Neither the inline offer nor popup should appear.
- Append the UTM to the URL (e.g., via browser location bar) and refresh. Both should show.
- Run a live ad test: Click through from social media and verify.
- Monitor with tools like Google Analytics to track conversions from these UTM-tagged visits.
Advanced Tips
- Combine Conditions. Add AND/OR logic, like UTM plus device type. For example, you might want to set up one condition detecting Mobile devices and show a different call to action than a desktop visitor.
- A/B Testing. Create multiple offers/popups with different UTMs to test variations to dial in messages that convert for your intended audience.
- Categorize Conditions. If you’re running numerous ads with many conditions, use GenerateBlocks Conditions Categories to organize them in a way that makes maintenance intuitive.
These features are lightweight and server-side evaluated, keeping your site fast.
This setup turns generic ad traffic into personalized journeys, much like advanced marketing platforms but built right into WordPress.
GeneratePress One is the easiest way to get started building high performance WordPress sites that provide easy-to-use Conditions for any kind of online marketing.